
Soakers are an essential part of any skaters' sports bag, and a really easy little item to whip up with a little stray fabric and 30 mins spare time. Make them as slim or as full as you want, using whatever type of fabric you'd like. Use up odd ends or buy a far-out fabric to make soakers that'll seriously brighten up your bag!
To the sewing machine it is then! *superman arms towards machine*

These little gems are really easy to make and double as a very nice Xmas gift for your coach and/or skating entourage. You could even go to town and embellish them with stones or beads, stuck on or hand-sewn. If you decide to do some fancy hand embellishment, remember that the key to a perfect pattern is to embellish the fabric while it's flat, prior to sewing up your soakers.
- Towelling fabric (yes, the stuff towels are made of, nice and absorbent. This is for the inside)
- Any fabric you like (this is for the outside so use something you find visually pleasing)
- Elastic (can be 1 cm or 5 cm wide, just use whatever you have)
- Sewing machine and thread (use matching thread for invisible seams, or mix it up and contrast!)
♥
Method ♥
1) Measure the length (from toe-pick to back end) and depth (from the sole of the boot to the part that touches the ice) of your blade, see illustration below. Lay your fabric out for cutting. Double the depth so that you have enough to cover both sides, and add another 2". This allows for a 1" gutter on either side of the blade through which the elastic will be passed. Cut your fabric by multiplying the length by 1.5 times the length of your blade. This will allow for the elastic to pull in the fabric and give a nice ruched finish.
Example:
If my blade is 10" long, and 2" deep, I will cut;
One piece of fabric, measuring 15" long, and 6" deep.
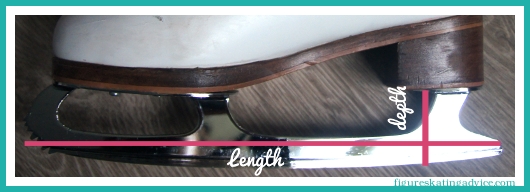
|
| How to measure blade length |
2) Once you have cut 2 pieces as discussed above, in both the outer fabric and the towelling fabric, you will need to sew 1 piece of outer to 1 piece of towelling. Go at it with your machine and a nice zig-zag stitch.
3) Now fold over your elastic gutter, towelling fabric towards the inside. Stitch along the length of the fabric. You now have 2 "tunnels" at the edges of your rectangle of fabric into which the elastic will go later on.
4) Now, fold them in half lengthways so that the towelling is on the outside (this way the seams we are going to sew up will be turn inwards upon completion revealing a pretty soaker!). Sew up the ends but leave the "elastic tunnels" open (you will finish these by hand once the elastic have been inserted and sewn up).
5) You should now have a soaker-resembling shape of fabric, albeit a little long for your blade.
When you're ready, here's how to add in your elastic. Generally you should try and get an elastic which has an appropriate width for your gutter, but anything will do and I appreciate the need for thriftiness! Use a safety pin (which you stick through the end of the elastic) to guide it through the gutters you made earlier. Adjust the elastic until it pulls the soaker into the original blade length (remember we cut the fabric one and a half times the length of the blade? It's now being pulled back to blade length - creating a yummy ruffle and loads of super padding for your precious blades). Sew up the ends of the elastic together with your machine. Use the backstitch option and go back and forwards a few times to ensure security.
At this point I'd like to point out that if you plan on applying any embellishment which is a defined shape (as opposed to a random scattering of beads/crystals, etc..) now it the time to do so, as you can work with the flat fabric and create your desired shape before the materials become bunched up under the force of the elastic.
When you're ready, here's how to add in your elastic. Generally you should try and get an elastic which has an appropriate width for your gutter, but anything will do and I appreciate the need for thriftiness! Use a safety pin (which you stick through the end of the elastic) to guide it through the gutters you made earlier. Adjust the elastic until it pulls the soaker into the original blade length (remember we cut the fabric one and a half times the length of the blade? It's now being pulled back to blade length - creating a yummy ruffle and loads of super padding for your precious blades). Sew up the ends of the elastic together with your machine. Use the backstitch option and go back and forwards a few times to ensure security.
6) Turn your soaker right side out (and admire your nifty handiwork)! Now all that's left to do is tuck in your elastic ends and sew up the ends of the gutters. This should take you 5-10 mins by hand.
More embellishment can be added at this time, such as a random scattering of hand-sewn beads or crystals (the Swarovski bicones are my absolute favourites and are perfect for no-glue hand-sewing projects like these little soakers!).
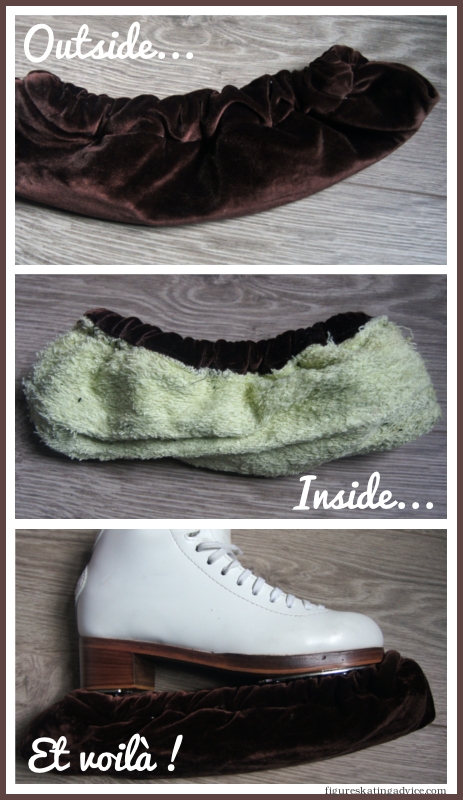
♥ Finished Product ♥
Here is my finished product (admittedly this photo has been taken a few years after the DIY... so they have seen plenty rink action and bag movement!):
♥ Uses For Your DIY Soakers ♥
The possibilities for this little hand crafting project are endless! Here are just a few ideas of what you can do with your new found talent:
♥ gift them to your coach
♥ gift them to other skaters
♥ create soakers that match this seasons skating dresses!
♥ add Christmas themed decorations to red velvet soakers to inject some holiday cheer in to the rink!
♥ make a luxury pair of soakers with plush velvets and add a monogram in Swarovski crystals
♥ use fabric odds and ends or bargain bin finds and make batches to sell at sales or fundraisers
.... and so much more besides!
Until next time, get creative with your sewing machine!
XOXO
Figure Skating Dress Sketch Templates (FREE DOWNLOAD!)
♥ Leave a comment below
♥ Visiting & Liking my Facebook page
♥ Tweeting to me: @skating_howto
♥ "Liking" this page on Facebook for all to see:
Okay. So I tried to do this, but I had no luck. I put in some quilting padding in between the terry cloth and cotton fabric to give it a bit extra, and ended up with not enough depth and a lot of length. So when the elastic Ruched, the middle just opened right up and didn't huge the blade like I want it to.
Reply DeleteI measured everything the way you suggested. (It's a men's skate. So I had 14" long and 2" deep which made it 21" x 6".)
What do you suggest I do? Add some depth?
I also feel like it might be a little too long for the blade, even if it ends up scrunching.
Please help!!
Hi there!
Reply DeleteI'm so sorry you had troubles making your soakers :-(
I think I see what's going on here. With having added a 3rd, and thick, fabric into the soaker, the capacity of all 3 fabrics to bunch together under the pressure of the elastic has been greatly reduced. I.e. the elastic wasn't "strong" enough to really pull in all those fabrics, and you've ended up with a bit of ruching, but which has mainly turned the soaker into a very open structure.
You've got too much length for the same reason. Where you'd normally gather your fabrics under the pressure of the elastic causing the length to shrink from 1.5 times the blade length to 1 times the blade length, here, you have so much fabric that it physically cannot bunch together any more.
The problem of having not enough depth may be coming from the amount of seam allowance you're using, i.e. the size of the gutter through which the elastic is passing. For this problem I'd suggest either adding a little depth and keeping your gutter the same size as your first attempt, or making your gutter smaller.
If you really want the wadding in between the terry cloth and the cotton, I'd suggest using a lighter wadding, and possibly the thinnest terry you can find too. The reason your soaker isn't bunching together correctly is that there is too much bulk, so try using thinner fabrics so that they can fold correctly under the pressure of the elastic.
Another option would also be to use a wider elastic, so that it exerts more tension on the fabrics. Although this will work to some extent, ultimately, if 2/3 thick fabrics are being used, they'll hit a point where they cannot bunch together any more because they in each others' way (think a muscle-bound guy who has such huge arms that he can't scratch his own ear! It's pretty much the same problem: too much bulk, not enough flexibility!).
I hope this helps, please let me know how you get on! You can always post a picture to the Figure Skating Advice Facebook page to show me how you're getting on!
XOXO
Hi, Just found your site and I am really enjoying it. I do not understand step 3 on having "2" tunnels. When I fold over the toweling to the inside and stitch I have 1 tunnel on the edge of the rectangle. Thanks in advance for your assistance and keep up the great work !
Reply DeleteHi there,
Reply DeleteThanks so much for leaving a comment and for your kind words! Glad you are enjoying the blog!
With regard to step 3, you need to turn over the edge of your towelling on both sides of your rectangle. That way you end up with a tunnel on each side of the fabric. You need to imagine that the elastic has to go right the way around the entire blade, and seeing as each side of the rectangle of fabric will ultimately be on either side of the blade, it's easy to visualise the fact that you need 2 elastic tunnels.
I hope this helps! I am going to get around to making a new tutorial with pictures and possibly video at some point, because I know how awesome it is to make your own soakers, and you guys deserve something easy to look at!
XOXO
I just made soakers for my son's hockey skates based on your tutorial and they turned out great!! I am so pleased. I used fleece fabric with a hockey design (left over from a prior project), an old towel and 3/8" elastic. This took me all of an hour, maybe. Hard on the thumbs for the threading and the hand sewing of the holes but it was worth it. They look great, are better quality than what I have found in stores, and will last for some time. Total cost: $2 for elastic! I am now making some for my daughter's figure skates. Thanks so much for sharing this tutorial!
Reply DeleteI would like to see a video on this. I also have a granddaughter who wants a bunny head on the front...If you could help me with that. Thank you.
Reply DeleteI was going to ask the same thing, I really would like to make one but not just with a towel maybe with more funky design cloth, but I really need to see step by step video and id like to make it soon could you help me with that?
Reply DeleteI just found your blog and I´m so in love with it! Congrats!
Reply DeleteLove it, made them today and they turned out great, tutorial was easy to follow. Thanks!
Reply DeleteWhat if we dont use soakers, is that bad? We only use a simple, small towel after getting off the ice, dry the blade, then put the guards on. Thank you so much for this website!
Reply DeleteIt is not a good idea to store your blades in guards, from Sk8stuff.com, "NEVER store your blades in hard guards - they hold moisture and are an almost guaranteed rust job." Guards for protection while walking, soakers for protection during storage.
DeleteYou shouldn't store your skates with hard guards on because it can cause your blades to rust!
DeleteI want to make these for the skates I just bought. Would it be okay to use shoe laces instead of elastic and just ties them tighter when putting them on the skates? Kind of like tightening the hood of a sweater. Thanks.
Reply DeleteSure, it's okay to use shoelaces instead of elastic.
Delete